
I’m a born Queenslander as are both my children, I’ve lived here in Brisbane on and off throughout my life (so far), my girls have lived here all their lives, and never did I know that the Queensland Museum (& … Continue reading

We’ve been hearing a lot about a place on the Gold Coast in the past 5 years that is said to be known as a Paradise for kids and somewhat a resort for adults and finally decided we’d … Continue reading

I’m a born Queenslander as are both my children, I’ve lived here in Brisbane on and off throughout my life (so far), my girls have lived here all their lives, and never did I know that the Queensland Museum (& … Continue reading

We’ve all done it, we’ve been that friend/bystander without children who’ve passed judgement on how a parent is doing something wrong, you know those line’s like “in my opinion…”, “if that was my child…” etc. Yeah, pretty sure you get … Continue reading
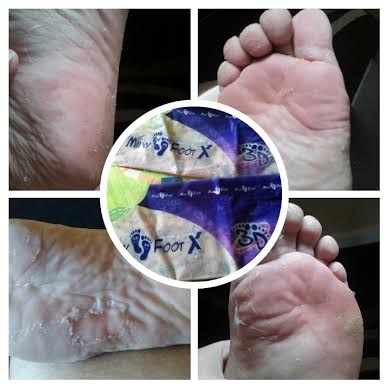 I don’t have the prettiest feet about, they do have the potential to be a little cute and with Milky Foot Active it was like the story of the Ugly Duckling, they soon became the softest feet in our home.
Milky Foot Active is simple to use pop on a movie or find your fave book, light a candle or as my husband does and plays video games, then slip on Milky Foot. I like to place socks over the Milky Foot, you don’t have to though, I do as it makes it feel more snug and makes it safer to walk about in if you need to instead of slipping. Milky Foot active is more for those whose feet may be a little stinky as it gives it a full ‘footover’ by softening and combating foot odour. If you don’t have foot odour you can still use Milky Foot Active but you can also use the original Milky Foot.
I’ve used the Original Milky Foot a few times before and love it, I’ve had no negatives with it. This is however the first time I have used the Milky Foot Active, for me personally it gave my feet a hot/cool hot feeling like you get with deep heat/tiger balm etc during the process and for about 20 minutes after.
My peeling started within 3 days and was complete by 1 1/2 weeks, which is faster than the Milky Foot Original. I didn’t mind the hot/cold feeling, but I did end up with a reaction between my little toe that took 2 weeks to heal, but I don’t think this was the Milky Foot’s fault, I think it was my fault and probably didn’t thoroughly rinse between the toes, this thing happens when you have a very curious 3 year old who is quiet.
Would I use it again? Due to being blessed with non stinky feet I’d say no, I’d stick to the Milky Foot Original.
Would I recommend it to others? If you have smelly feet, absolutely. I bought another for my mum to try at the same time, as she gets a stink after wearing shoes for a long time, and after flying from Seychelles to Dubai, Dubai to Singapore and finally Singapore to Brisbane her feet stunk, who’s wouldn’t?!. She used Milky Foot Active and the odour was eliminated and she had soft feet the perfect foot pamper after a few long flights.
I would recommend if your getting your feet ready for them to be ‘displayed’ to other’s for things like Weddings, or something that you have intentions of wearing open shoes to do the Milky Foot process 3 weeks in advance so the peeling can be complete. If you’re in a rush, to speed up the process I find nightly soaking my feet in the bath or a bucket for at least 10 minutes, if you have a foot bath this would be a great time to put it to use.
Click MILKY FOOT ACTIVE to find out more, available at Chemist Warehouse and some other chemists. Don’t forget to pop on over to my Facebook page Everyday Mum and say hi! I’m also on Instagram, just search for everydaymum
 We’ve had our Kambrook Air Chef Air Frying Oven for a while now, it feels like it’s been in the family for years so since we’ve really, really used it, I think it’s time for a review.
Let’s get something straight, this is not a DEEP fryer, so it will not cook some foods that you can only use by deep frying, but it’ll cook a heap more foods healthier and crispier than your deep fryer using little to no oil at all.
I’ve roasted nuts, fried chicken, baked chops/steak, baked cakes & scones, baked desserts, fried salt & pepper quid/prawns, grilled fish, fried wedges and crispy chips, nuggets, party pies, crumbed fish, the list is endless and totally up to you. Some specs, it has a 2.5L Non-Stick basket, 1550 wattage, temperature dial up to 200 degrees Celsius, 30 minute Auto Off timer and two lights for cooking and heating.
Here are a few recipes of mine I’ve used with the Air Chef;
Pros;
Cons;
The Kambrook Air Chef Air Frying Oven is used every few days in our home. My husband will only eat steak cooked in it, and says he loves it as it stays tender and juicy and locks in flavour. Garlic prawns is a fave in the Air Chef for us.
A heads up, I don’t recommend using baking paper in it, a friend and I had once and it lit up on fire very quickly. I have grilled fish successfully in aluminium foil without issue.
Would I recommend it? Yes. Who would I recommend it for? Everyone, but if your looking to give someone moving out of the family home for the first time, or someone about to move and start college/uni I think this is the ultimate gift for them, as they can have meals that would take a long time in the oven in half the time. Great for those who are single, or no children and those with children who need a quick lunch or dinner of nuggets, wedges, party pies, spring rolls etc. Even our older generation, my grandmother could use one, she has said she no longer puts the oven on as it’s just her.
It’s easy to use, it has a guide printed on top of the Air Fryer but this is a general guide, you may need to tweak the times and temperature to your liking as we have. Basically you pop whatever it is your wanting to cook into the tray, if it’s something you would normally pre heat in the oven than do the same and pre heat the Air Chef, turn it to the time and temperature you like and close the Air Chef. You can check your food, just pull the Air Chef open, the timer will continue but it will automatically stop the cooking process while open, once you close it, it will recommence cooking. A tip, if you like your cakes to stay a bit moist add about 100ml or more water to the base.
If your searching for baking tins/pans to fit Coles, Kmart, Robbins Kitchen are some retailers who I know stock a small range. Baking and catering stores have more varieties too, but most need to be purchased online and can be costly. You do not need a pan/tray for all things cooked in the Air Chef, you can toss chips, wedges, steaks, chops, prawns etc directly into the 2.5L basket.
The Air Chef is a kitchen appliance that I would gladly recommend to people.
If you’d like to know more of the specs side check out Kambrook’s Air Chef Air Frying Oven. Don’t forget to pop on over to my Facebook Page Everyday Mum and say hi, or look me up on Instagram by searching everydaymum
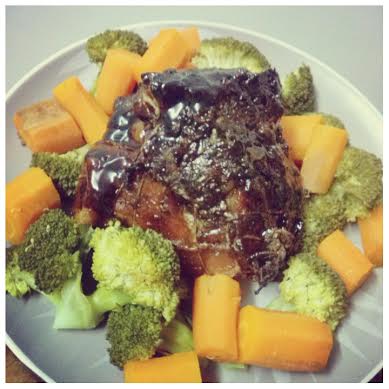 This was an experiment that was a success and so easy to make, I’ve never used Sage before and even as it was cooking I really thought it wouldn’t taste good, how wrong I was, very very wrong, this Sage Pork with Balsamic & Brown Sugar Glaze was delicious, but please don’t take my word for it, give it a go, it’s great for all (who enjoy pork), I cooked mine in my Kambrook Slow Cooker.
Ingredients
Ingredients – Glaze
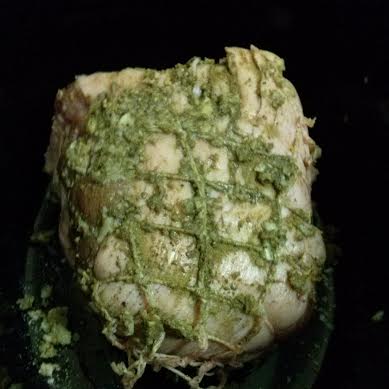 1. In a small bowl mix Sage, Salt, Pepper and Garlic.
2. Score the Pork skin and rub the entire cut with the spice mix you prepared.
3. Allow to marinate for at least 1 hour.
*Tip; can be marinated in the fridge before bed at night to be placed in the slow cooker in the morning.
4. Add 1/2 cup of Water into the Kambrook Slow Cooker and place the marinated Pork Cut into the Slow Cooker and close with lid.
5. Set the Slow Cooker on Low and let it do it’s thing for a minimum of 6 hours.
*Tip; I did a test drive and it’s cooked at 6 hours but can continue for 3 more hours, so perfect to set before walking out to work or a busy day.
6. Now the glaze, in a small saucepan add the Brown Sugar, Corn Flour, Balsamic Vinegar, Water and Soy Sauce and cook over a medium heat, stirring until a thick consistency (thick like honey), this should take about 6 minutes.
7. The last hour to half hour of cooking apply the glaze 3 or so times.
*Tip; before serving I like to pop it into the oven for 15 minutes for a crunchy crust.
8. Enjoy, served beautifully with steamed vegetables or mash or both. We also use the left over glaze to use over the pork like a gravy once on the plate.
Don’t forget to pop on over to my FaceBook Page Everyday Mum and say hi, or follow me on Instagram, just search everydaymum and if your interested in my Kambrook Slow Cooker check it out HERE
 This popular (among my family) recipe of mine makes a large batch of Fried Rice which is fine to be frozen or reheated the next day. If your not a fan of freezing food or eating left overs for lunch you can half the ingredients. This is cooked best in the Kambrook Wok and using my Spicy Rice recipe.
1. Heat Olive Oil in the Kambrook Wok on 4 (medium) setting.
2. Brown the Chinese Pork Sausages, Bacon and Garlic.
3. Gradually add the Spicy Rice to the Wok stirring as you add more Spicy Rice.
*Tip; use Spicy Rice that has cooled down or even been in the fridge over night, it seems to work better. If you use my Spicy Rice recipe you will have about 1 cup of cooked Spicy Rice left over, it won’t all fit in the Wok, it’s fine to be frozen and used as a side.
4. Stir through the Sesame Oil, Fish Sauce, Light Soy Sauce and Mirin, allow the flavours to mix through for about a minute.
5. Now add in your veggies and sliced up Omelet and gently combine through.
That’s it, my Fried Rice can be served alone, as a side or with added ingredients like Prawns and or Red Pork.
Don’t forget to pop on over to Everyday Mum’s Facebook Page and say hi! Fancy a Kambrook Wok? click HERE for more details on the Wok.
 Spicy Rice is a delicious, aromatic accompaniment dish that can be served with an array of dishes, my favourite way is used to make Fried Rice. This is easy and effortless to make.
Ingredients;
Now the real easy part, pop all the ingredients into the Kambrook Pressure Cooker, stir until all ingredients are combined, twist the lid on, press White Rice, it should come up with 12 minutes, I add 2 minutes to it, press start and that’s it. Once done, open up the Pressure Cooker and stir the rice whilst still hot, this will help keep it “fluffy”.
*Tip; have the pressure vent half open, you don’t want to release all the moisture whilst cooking or else your rice will be horribly dry, BUT prior to opening the Pressure Cooker carefully flip the vent completely open and release the remaining steam.
Don’t forget to pop on over to my Facebook Page Everyday Mum and say hi! and if you want get more info on my fancy Kambrook Slow Cooker click HERE
 Scotch Bonnet Prawns or as Miss Ashley calls them “Burn Your Bum Prawns” are as you’d guess VERY HOT! So if your not a fan of heat maybe half your Scotch Bonnet Chili? Oh and this is not a meal for the kids.
I grow my own Scotch Bonnet Chilies and love them as they are so aromatic, flavoursome and pack a punch.
So are you game to give it a go?
Ingredients;
*Tip; use fresh Ginger and Garlic if possible and grind/crush/mince both together in a Mortar & Pestle
Now to cook this to perfection you’ll need to get your hands on a Kambrook Wok, why a Kambrook Wok? Because I know it works and won’t burn in it.
 Let’s go! Place the Wok on 4 setting and add the Extra Virgin Olive Oil, allow the oil to heat up. While the oil is heating up, which in the Kambrook Wok is pretty darn fast, in a mug or small bowl mix the Ginger, Garlic, Fish Sauce, Sugar, Lemon Juice and Red Wine until combined.
Add the Prawns into the Wok and cook for about 2 minutes then add the sauce mixture along with the Scotch Bonnet Chili, cook until the Prawns are a lovely red.
*Tip; if the sauce is runny, before turning off the Wok, in a glass add a 1 1/2 teaspoon of Corn flour to 3 teaspoons of water, combine and add to wok.
Serves 4 and cooks really really fast and served nicely on rice or noodles, for a crisp taste I recommend adding some fresh Coriander.
Enjoy and don’t forget to pop on over to my Facebook Page Everyday Mum and say hi! Check out the Kambrook Wok
 If you have kids you would know the tune “it’s a pillow, it’s a pet, it’s a Pillow Pet”, you may even know this if you don’t have kids, it kind of sticks in your head. Well, the folks at Pillow Pets have gone and come up with the Disney Glow Pets Range. There is Minnie Mouse, Mickey Mouse, Winnie The Pooh, Tigger and Eeyore.
My girls have taken Minnie Mouse under their wing and blankets and put her through their rigorous testing for over a month and here are our thoughts on Minnie Mouse Glow Pet.
She is super soft, not just the new soft you first get with plush toys that over a few weeks they get a bit stiff, nearly 2 months on and she is as soft as when the girls first got her, and the way Miss Ashley has dribbled on poor Minnie, it should have matted bits, but there are none at all. And while we’re on the fur side of things, how many times do you get a plush toy and your forever finding fluffy bits from them on your clothes, sofa etc? Well, Minnie has been through the entire house (maybe not the toilet or bathroom) and the car and not one bit of pink in sight.
Her battery pack and insert; the kids cannot get to the battery as it is secured with a screw in the lid and not a flap, I know many hate the screws but when you have very curious children like Miss Zahra the screw in the lid is very much appreciated. The battery pack itself lies flat inside Minnie Mouse’s rear end. Unless your looking for it you won’t know it’s there, you can lie on it and not feel it, it won’t poke or move and being that it is wedged between the top and bottom of the pet it is protected from falls and throws, yes sadly Minnie Mouse has been tossed mid tantrums, but we promise no real breathing mice were harmed. Her ON?OFF switch is easily found by a cute little star on her left paw and very easy to operate, perfect for little hands.
 Now to what makes this an extra special Pillow Pet, her Glow. The micro energy efficient LED lights do not warm up, they generate zero heat so are safe to pop in bed with your little one sleep with ease and peace of mind. Another thing, you don’t have to remember to come back to turn it off, the smart people at Pillow Pets have created these Glow Pets with a built in timer that will automatically turn off after 20 minutes. The glow is also a lovely progressive glow, Miss Ashley says it puts her to sleep cos she watches it. The glow is a lovely soft glow not bright to keep little one’s up, but just right to make them feel safe and enough to lull them off to wonderland of sleep.
Battery life; Minnie takes 3 AA batteries which are not included. We put rechargeable batteries in, and as mentioned we’ve had Minnie close to 2 months and only now is the glow started to fade a bit, I think another week and she’d be in for a battery change, this to me is great as Minnie is used nightly and without a doubt she is pressed on a few times too.
 Durability; for those who don’t know, my Zahra is 2 and she is my durability tester, if toys are going to break, she’ll break them without a doubt. Minnie has been put through Miss Zahra’s testing and has passed with flying glows. Miss Zahra’s testing includes throwing Minnie off the slide, bounced off of the trampoline, sat on, squished and closed in a door, rolled on and much more with the odd falling asleep with. Minnie has zero injuries and is in perfect condition. So is she durable? YES! Very.
Apart from all the above, I think the Pillow Pets Glow Pets range is awesome so do both my girls, and yes I’d very much recommend them. They are the perfect size for big and little kids and won’t take up a heap of room on their beds.
Pillow Pets Disney Glow friends are available at Big W for RRP $29.99ea
Don’t forget to pop on over to my Facebook Page Everyday Mum and say hi! If you have a Pillow Pet why not share a picture there too, stay up to date with Pillow Pets